


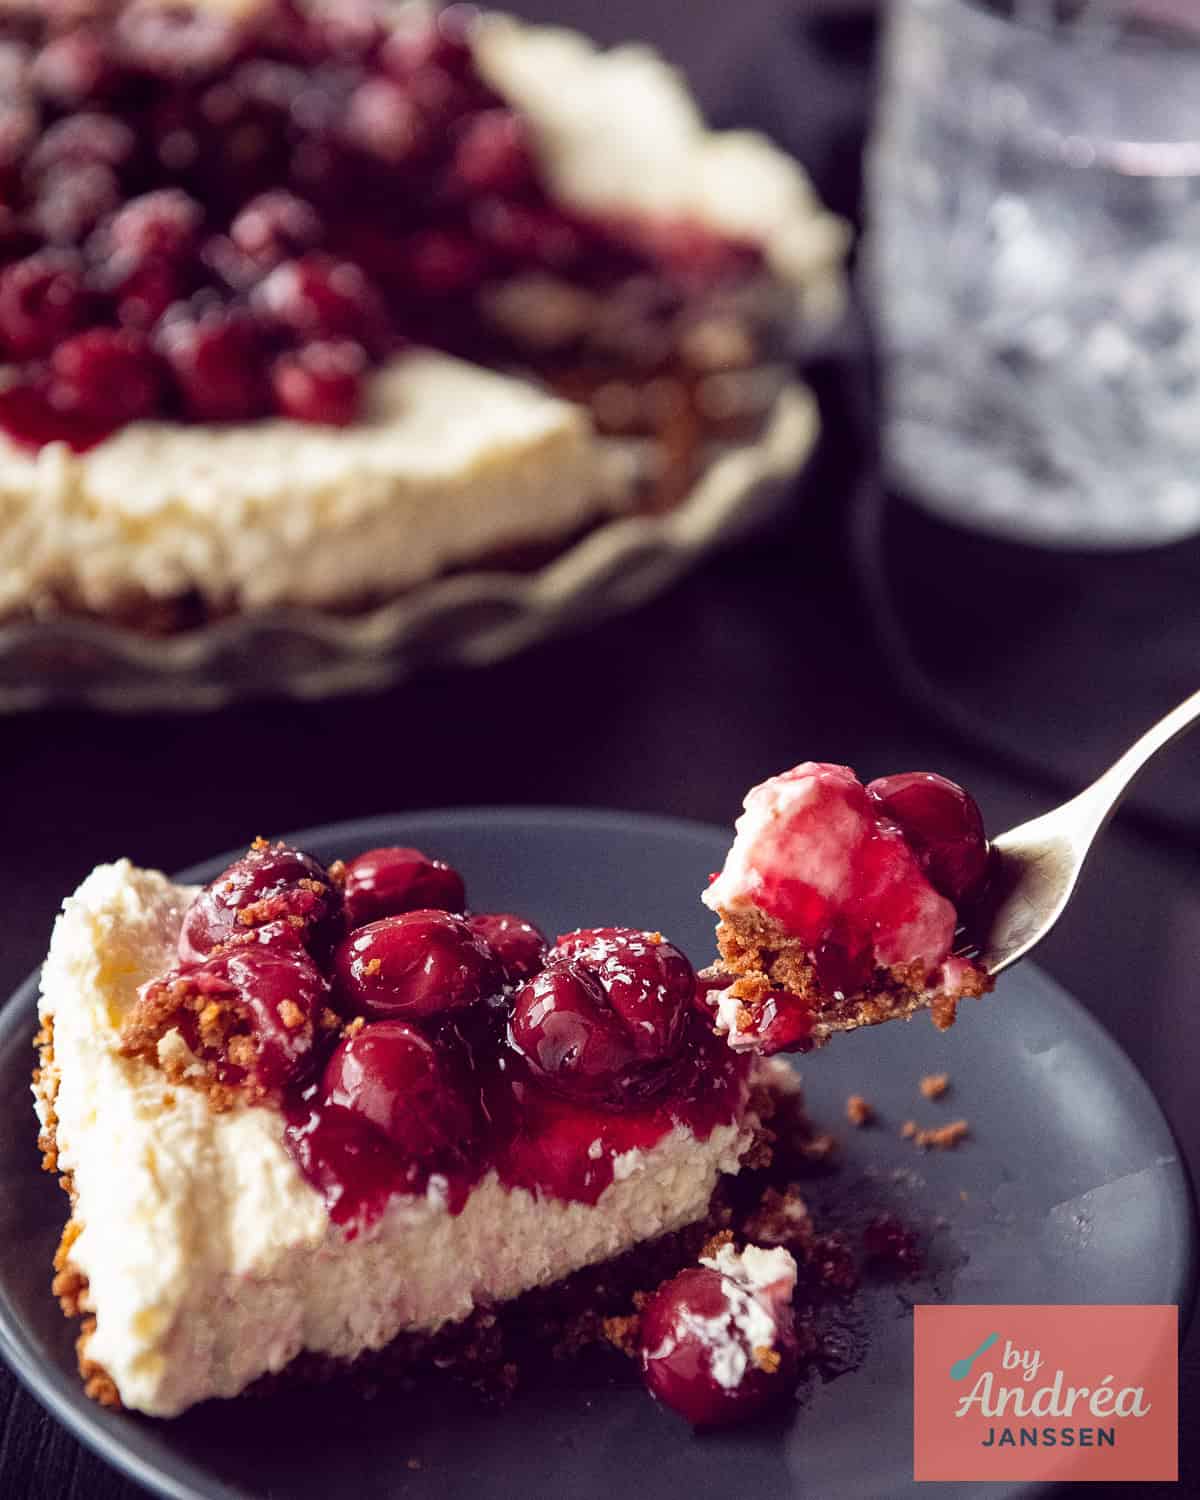
Buttery Biscoff crust, silky cream cheese filling, and a thick, glossy layer of cherries on top. This is the classic Dutch Monchou taart (no-bake cherry cheesecake) you picture in your head: clean layers, big flavor, every slice on point.
In One Glance
- 🥧 Recipe: Dutch Monchoutaart With Cherry Topping
- ⏱️ Prep time: about 25 minutes
- 🧊 Chill time: at least 4½ hours (preferably overnight)
- 🕒 Total time: about 5 hours (mostly chilling)
- 👨👩👦👦 Servings: about 10-12 slices
- 😋 Taste: creamy, light, vanilla, warm spice from Biscoff, sweet-tart cherry finish
- 🧾 Main ingredients: Biscoff cookies, butter, cream cheese, heavy cream, sugar, vanilla, cherry topping
- 🍴 Difficulty: easy: clear steps, no baking, beginner-proof
Jump to:
Creamy Monchoutaart With Biscoff Crust
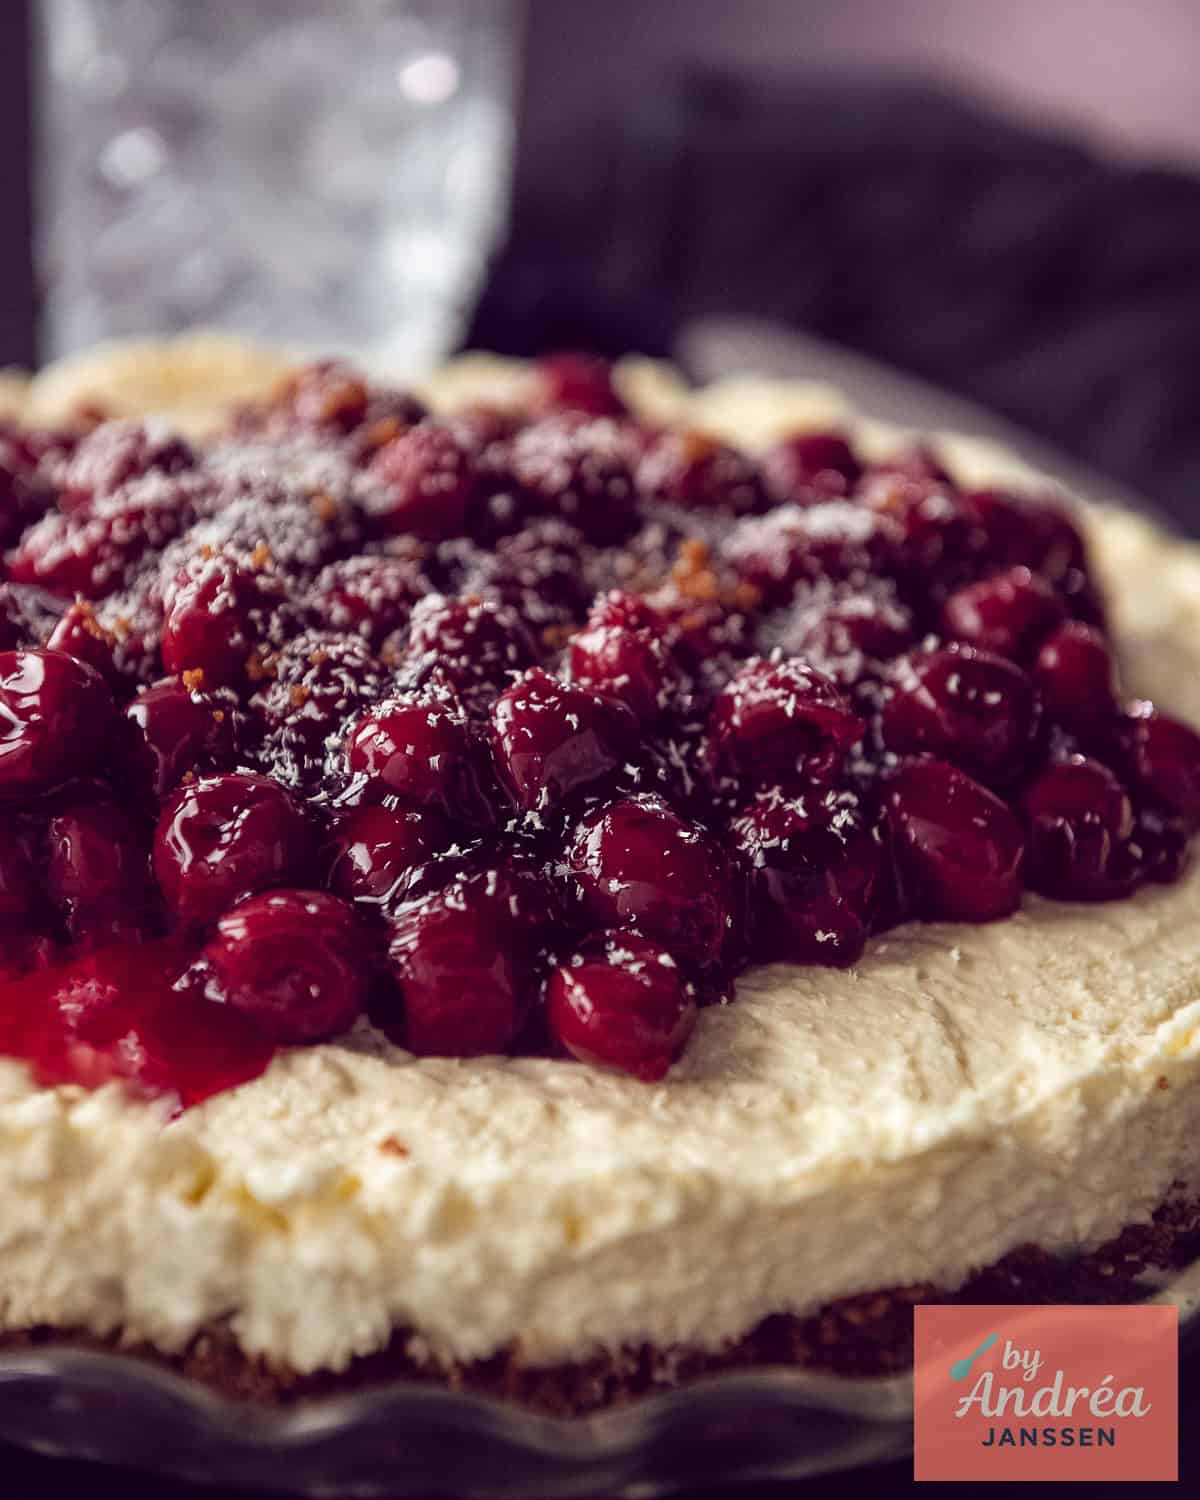
Crisp Biscoff cookie crust. Soft, velvety cream cheese filling. A generous layer of homemade cherry pie filling on top. This cheesecake is exactly what you want it to be: creamy, bright, easy to slice, and just over-the-top enough to feel like a celebration.
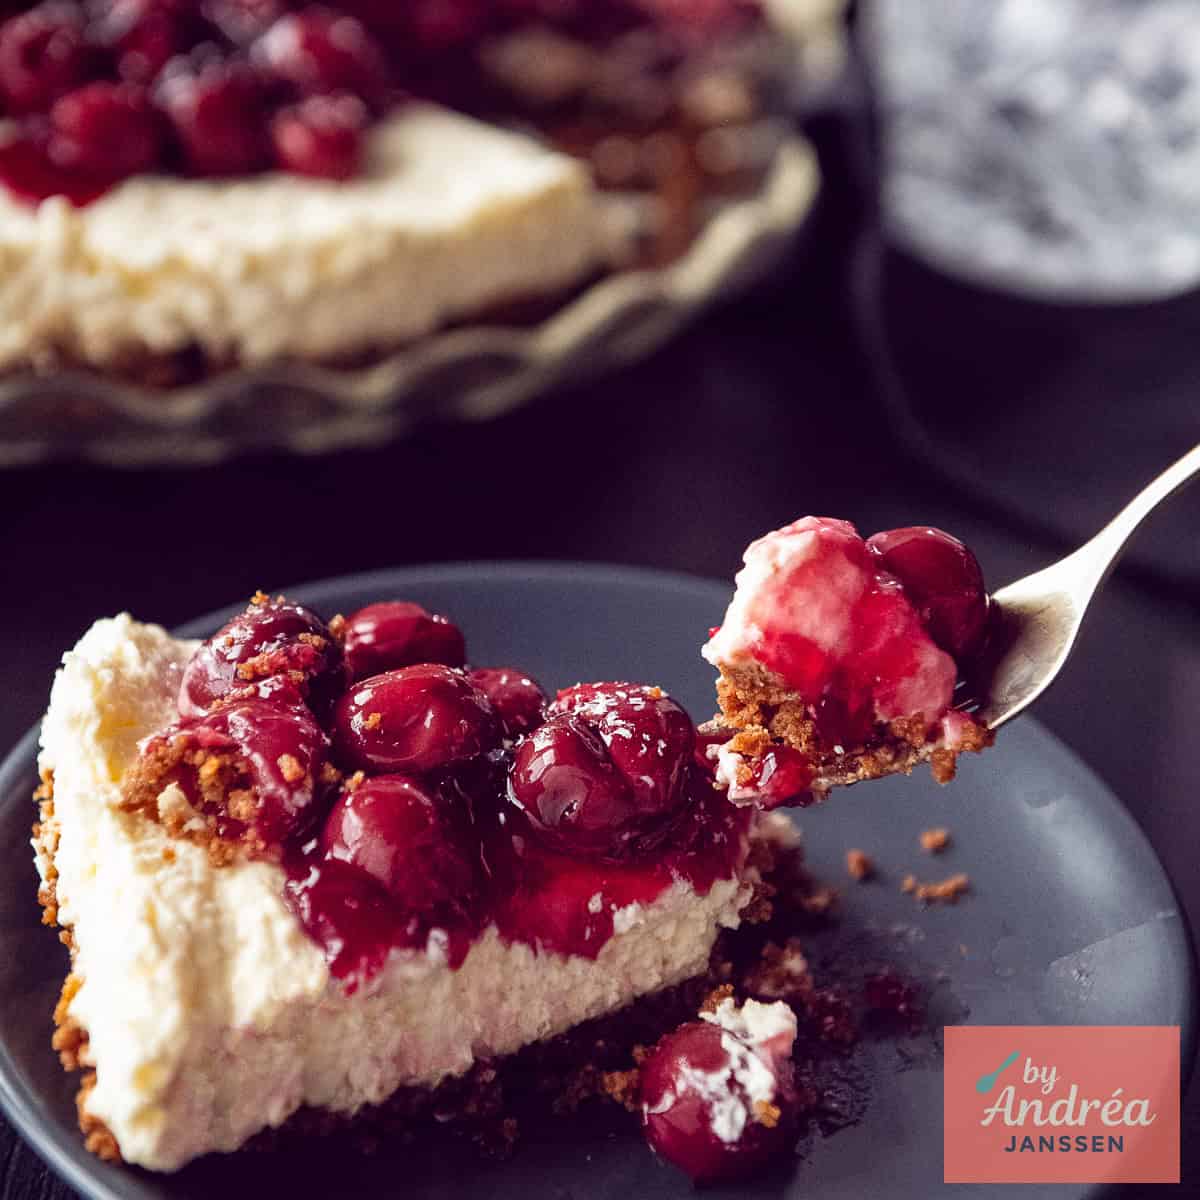
No wobbly canned layer, no collapsing tower of cream. Just three clear layers that work together in every bite. You can make it ahead; it sets beautifully in the fridge, and it arrives at the table looking like you planned this weeks ago.
Pressing the Biscoff crumbs already smells warm and spiced. The cream cheese filling whips up smooth and light. Your own cherry topping finishes it: deeper flavor, better texture, and that rich red shine. When you pop off the springform and the cheesecake stands tall with that cherry layer glistening on top, people pause for a second. That's what a classic should do.
Why This Recipe Works
- No-bake, low stress: The fridge does the work. No cracking, no sinking.
- Light and creamy texture: Whipped cream folded through cream cheese gives a fluffy, mousse-like filling.
- Bold Biscoff base: Spiced cookies + butter = flavor, crunch, and a firm crust that cuts neatly.
- Cherry on top: A generous layer of cherry topping finishes the Dutch Monchou vibe in one glance.
- Easy to prep ahead: Perfect for parties and next-day desserts.
What You'll Need?
Exact amounts in the recipe card below.
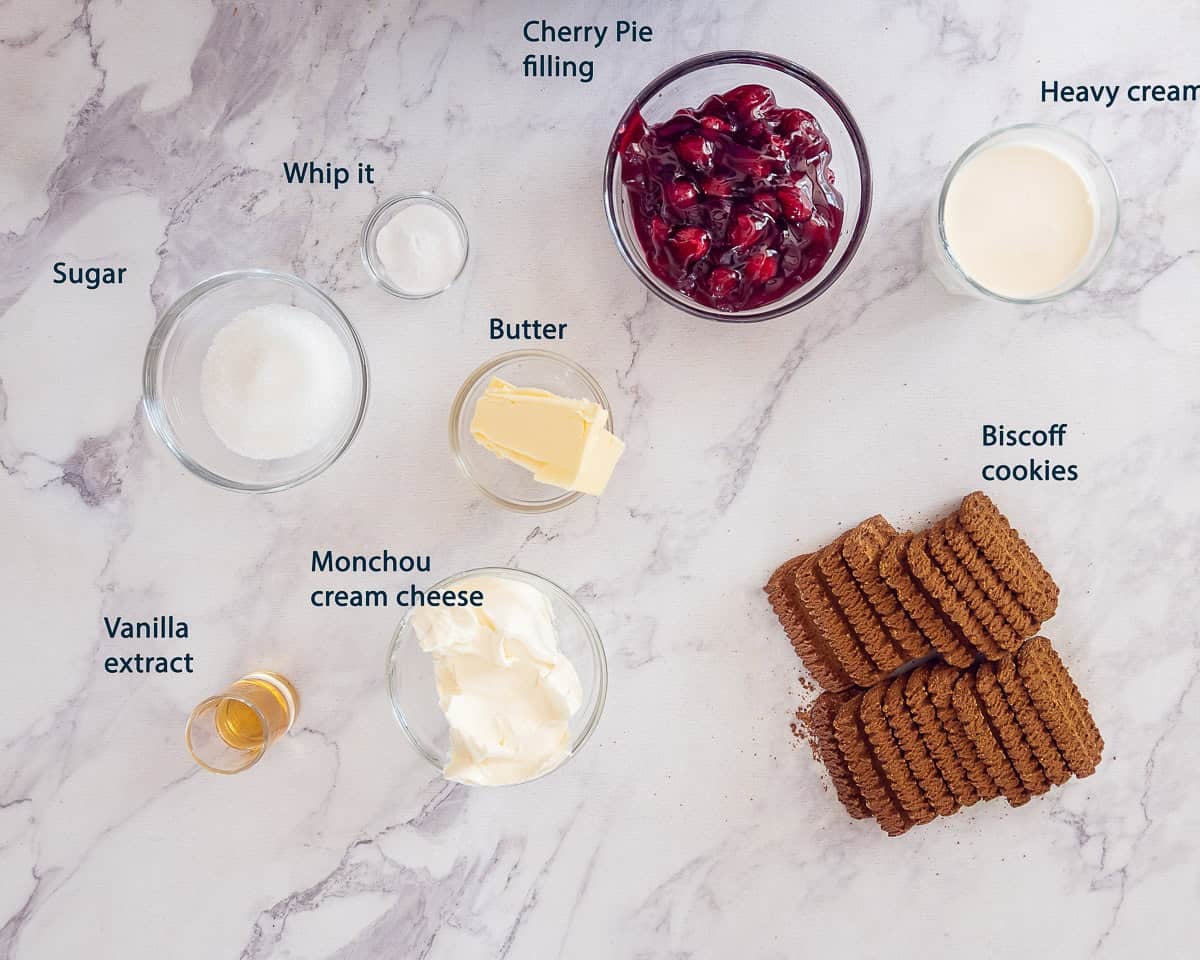
- Biscoff cookies: crushed into fine crumbs; sweet, spiced, and sturdy.
- Unsalted butter: melted; holds the crumbs together and gives a firm, crunchy base.
- Monchou cream cheese: room temperature for a smooth, rich filling. If you can't get Monchou, you could use full-fat cream cheese instead.
- Heavy cream: cold; whipped in for a light, creamy texture.
- Sugar: sweetens the cream cheese without making it heavy.
- Confectioner's sugar: blends easily into the whipped cream.
- Vanilla extract: adds a warm, round flavor. Make your own vanilla-extract.
- Whip it: Whipped cream stabilizer (optional): gives extra hold on warm days or long dessert tables.
- Cherry topping: Homemade cherry pie filling: thick, glossy, and loaded with cherries; cooled before it goes on top.
How to Prepare
The full step-by-step instructions are in the recipe card below.
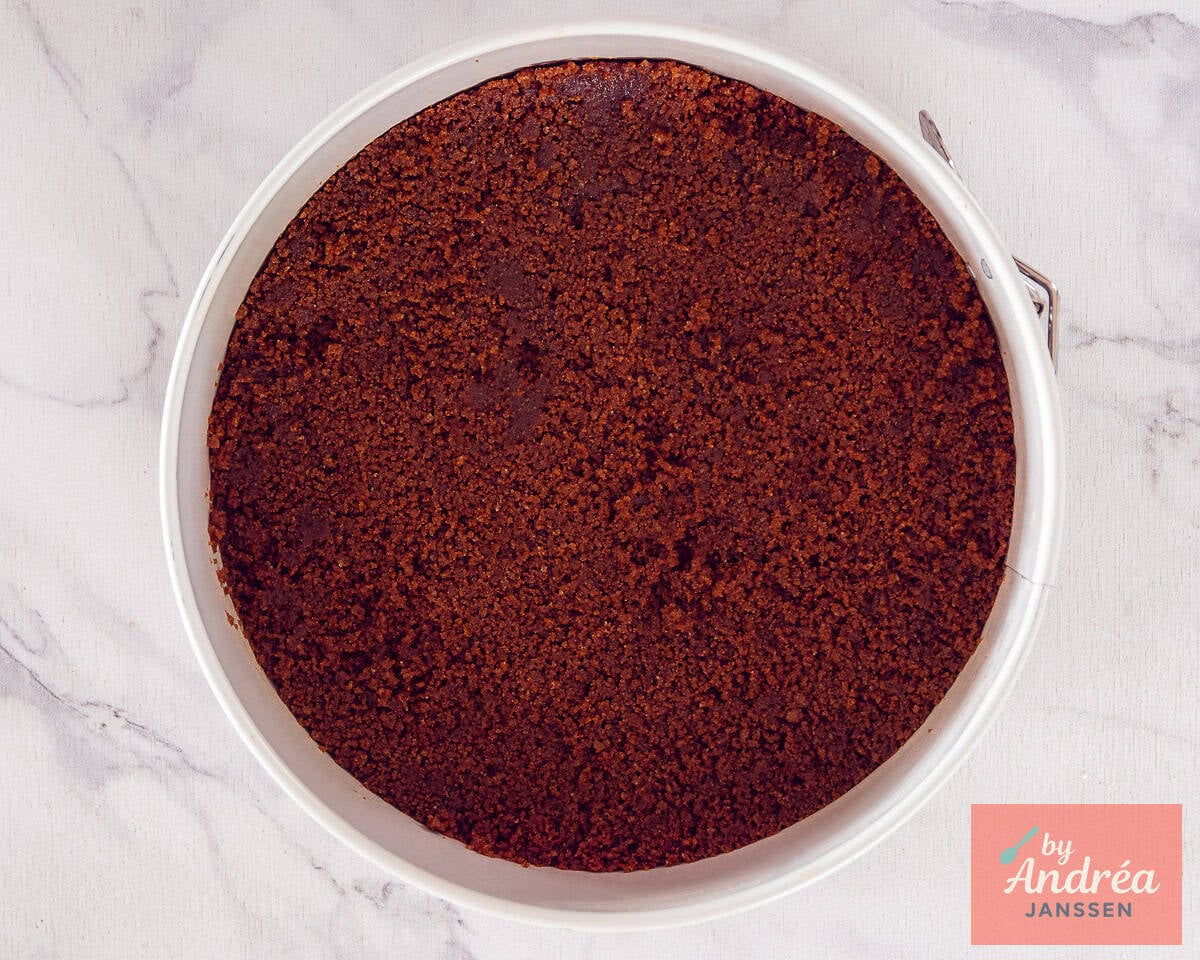
- Step 1: Make the Biscoff crust: mix crumbs with melted butter, press firmly into the pan and chill.
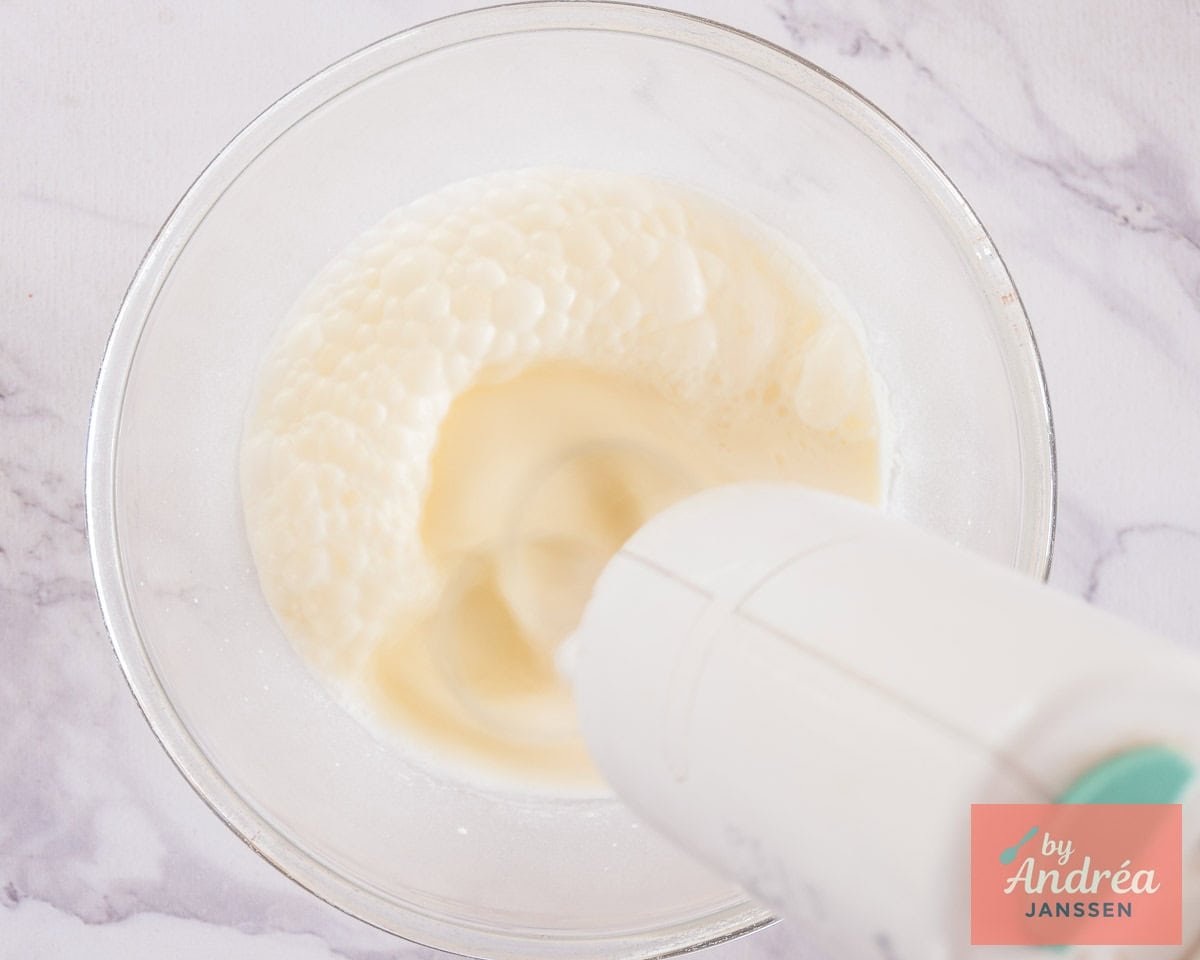
- Step 2: Whip the cream and mix the cream cheese with sugar and vanilla, then fold together into a smooth, fluffy filling.
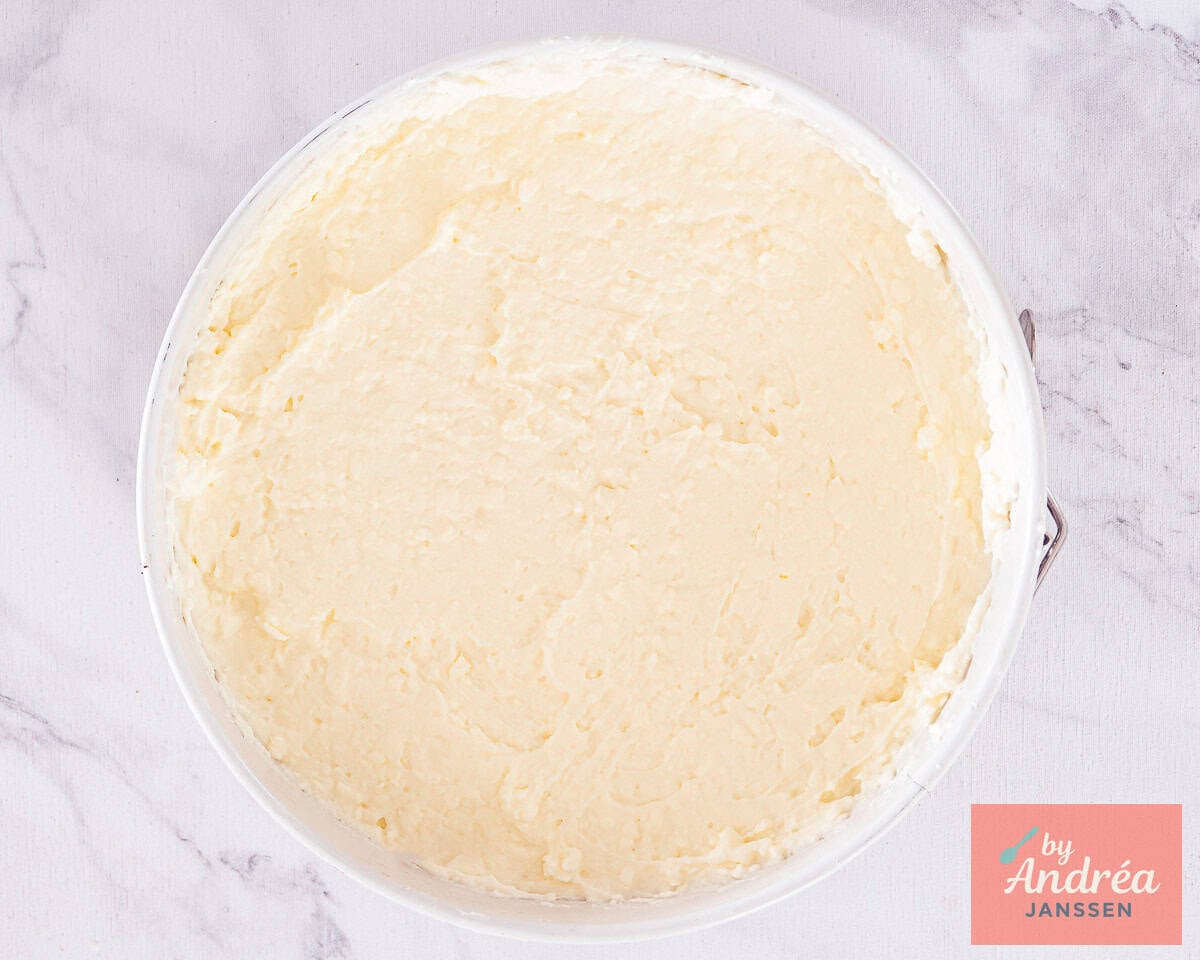
- Step 3: Spread the filling over the cold crust, smooth the top and chill until fully set.
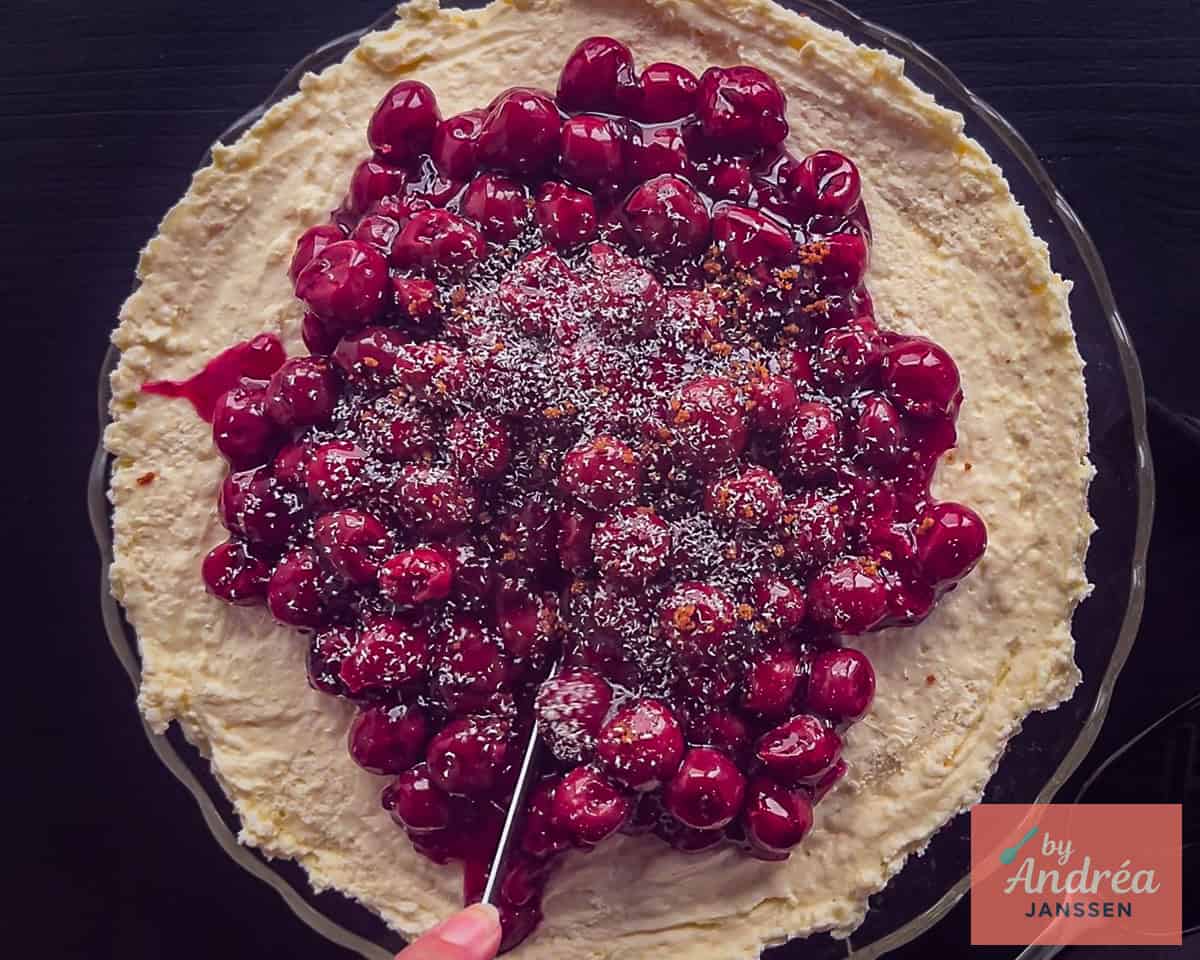
- Step 4: Spoon the cooled cherry topping generously on top, chill briefly and slice clean wedges.
Top Tips
- Bring the cream cheese to room temperature: Soft cream cheese blends smoothly with the sugar. No lumps, no overmix needed.
- Press the crust firmly: Use the back of a spoon or the bottom of a glass and really press the crumbs down, including up the edges if you like. A tight crust means clean slices.
- Whip the cream to soft peaks: Stop when the cream forms soft peaks that hold their shape but still look smooth. Too soft and the filling won't set well; overwhipped and it can turn grainy.
- Use stabilizer when you need extra hold: If it's warm or the cake will sit out of the fridge for a while, add a packet of whipped cream stabilizer to the cream. You still only whip to soft peaks.
- Chill long enough: Give the cheesecake time. At least 4 hours, but overnight is ideal. A fully chilled cake slices better and keeps those layers sharp.
- Add the cherry layer to a fully set cake: Make sure the cream cheese layer is firm before adding the topping. That way the cherries sit on top instead of sinking in or sliding off.
- Slice with a warm knife: Dip a sharp knife in hot water, wipe dry, cut, and clean between slices. You'll get those perfect red-white-golden layers.
Did you make this delicious recipe? Tag #byandreajanssen via Instagram! I love to see what your creation looks like and regularly share the most beautiful photos of you! Did you like this recipe? Then leave a rating on the recipe card! Your feedback helps other home cooks and me enormously.
Need more inspiration?
- You can find video recipes on my YouTube channel.
- And don't forget to save the recipes on Pinterest, so you can easily find them again next time!
📖 Recipe
VIDEO
RECIPE CARD
Recipe Help
Two easy tools to make cooking even easier. Cooking mode keeps the screen on. The easy-step recipe displays the recipe step by step, including the ingredients needed. And you can adjust servings easily
Ingredients
Biscoff crust
- 2 ½ cups Biscoff cookie crumbs, (9 oz)
- 7 tablespoons butter, melted
Monchou layer
- 1 ⅔ cups heavy cream, cold
- 2 tablespoons confectioners sugar
- 1 packet Whip it, cream stabilizer (optional)
- 16 oz Monchou creamcheese, or full-fat cream cheese, at room temperature
- ½ cup sugar
- 2 teaspoons vanilla extract
Cherry topping
- 2½ cups homemade cherry pie filling, cooled (enough for a thick layer on top)
All my recipes are written both in Metric (gram / ml) and US Customary (cups / pounds). Here you can select which type of amount you would like to see.
Instructions
Biscoff crust
- Line the bottom of a 9-inch springform pan (24 cm) with parchment paper.
- Combine the Biscoff crumbs and melted butter until every crumb is coated.2 ½ cups Biscoff cookie crumbs, 7 tablespoons butter
- Press the mixture firmly and evenly into the bottom of the pan (and slightly up the sides if you like).
- Chill while you prepare the filling.
Monchou Cheesecake layer
- In a medium bowl, whip the heavy cream with the powdered sugar (and whip it stabilizer, if using) to soft peaks.1 ⅔ cups heavy cream, 2 tablespoons confectioners sugar, 1 packet Whip it
- In a separate bowl, beat the Monchou cream cheese, sugar, and vanilla until smooth and creamy.16 oz Monchou creamcheese, ½ cup sugar, 2 teaspoons vanilla extract
- Gently fold the whipped cream into the cream cheese mixture in 2-3 additions until fully combined and fluffy.
- Spoon the filling onto the chilled crust and smooth the top.
- Chill for at least 4 hours, preferably overnight, until set.
Cherry topping
- Make sure your cherry pie filling is completely cooled and thick enough to hold its shape.2½ cups homemade cherry pie filling
- Release the chilled cheesecake from the springform pan.
- Spoon the cherry topping over the cheesecake and spread it out to the edges in an even, generous layer.
- Chill for another 30 minutes before slicing.
Notes
Most likely it needed more chilling time, or the cream was underwhipped. Chill it longer, and next time make sure your cream reaches soft peaks before folding it in. 5. My topping slid off. What happened? Either the cheesecake layer wasn’t fully set, or the cherry topping was too warm or too thin. Always cool both, and only add the topping once the cheesecake is firm. 6. Storage
- Fridge: Cover and keep for 2-3 days.
- Freezer: best stored without the cherry topping, up to 1 month. Thaw in the fridge, then add the topping.
Nutrition


Leave a Reply