


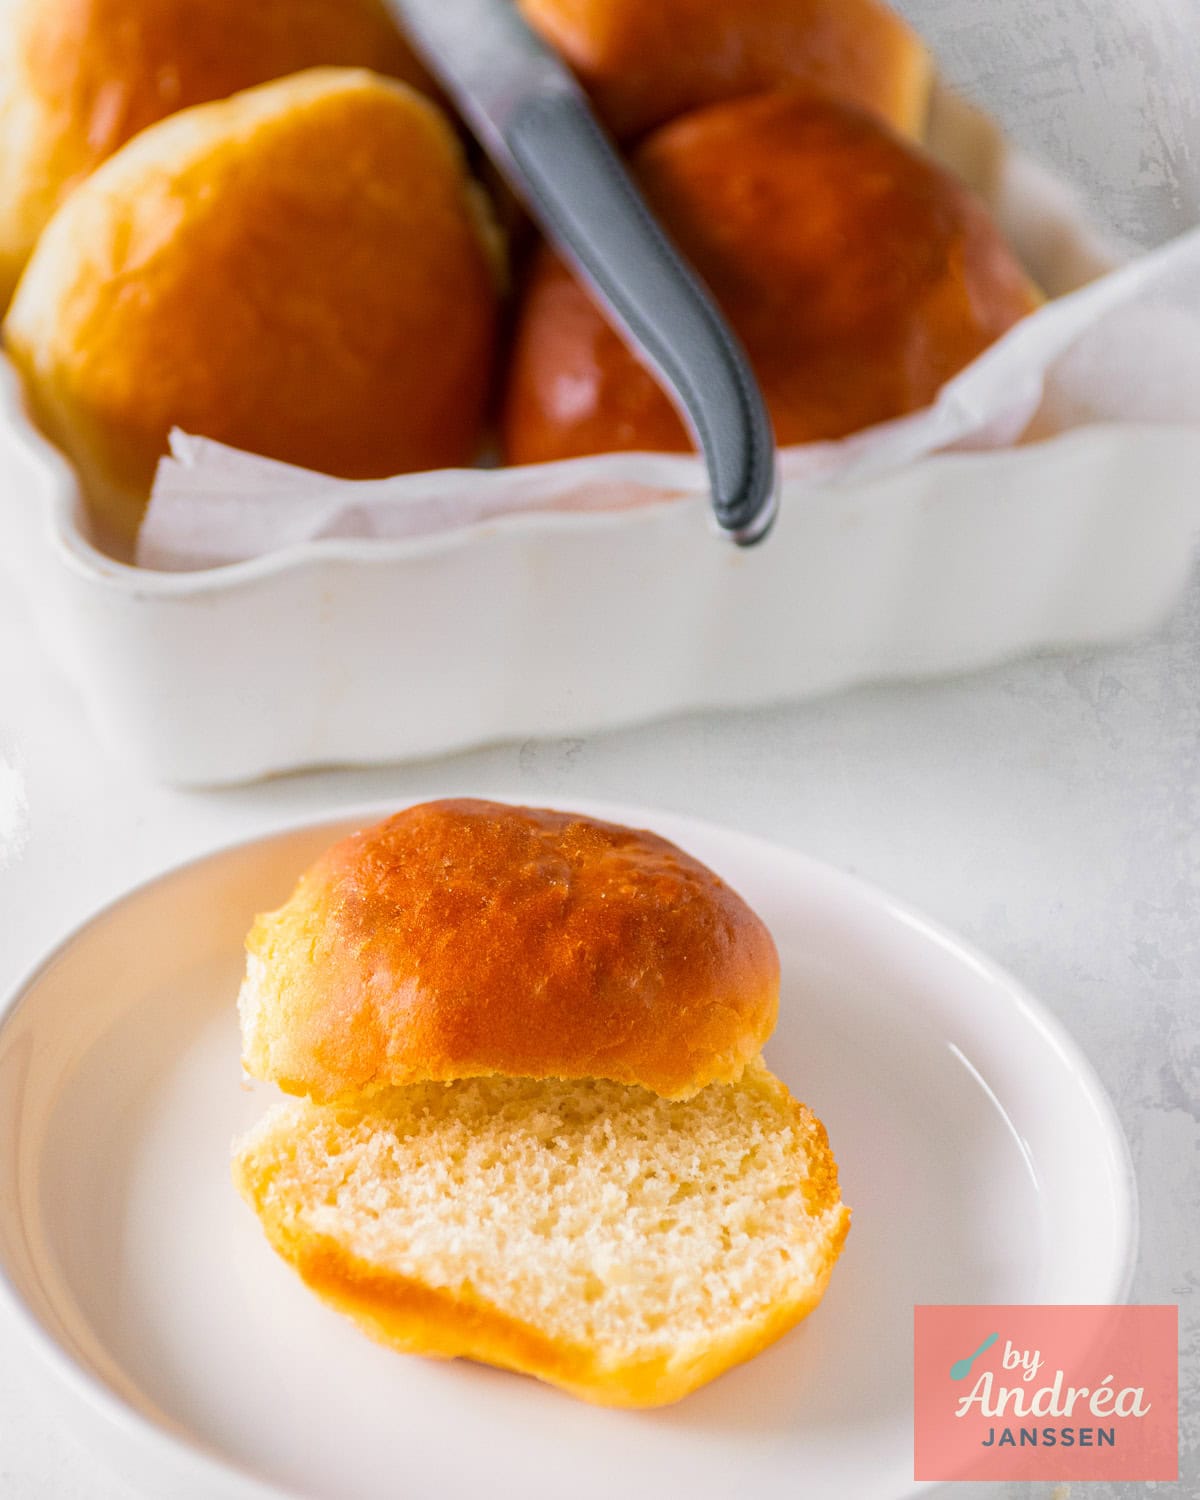
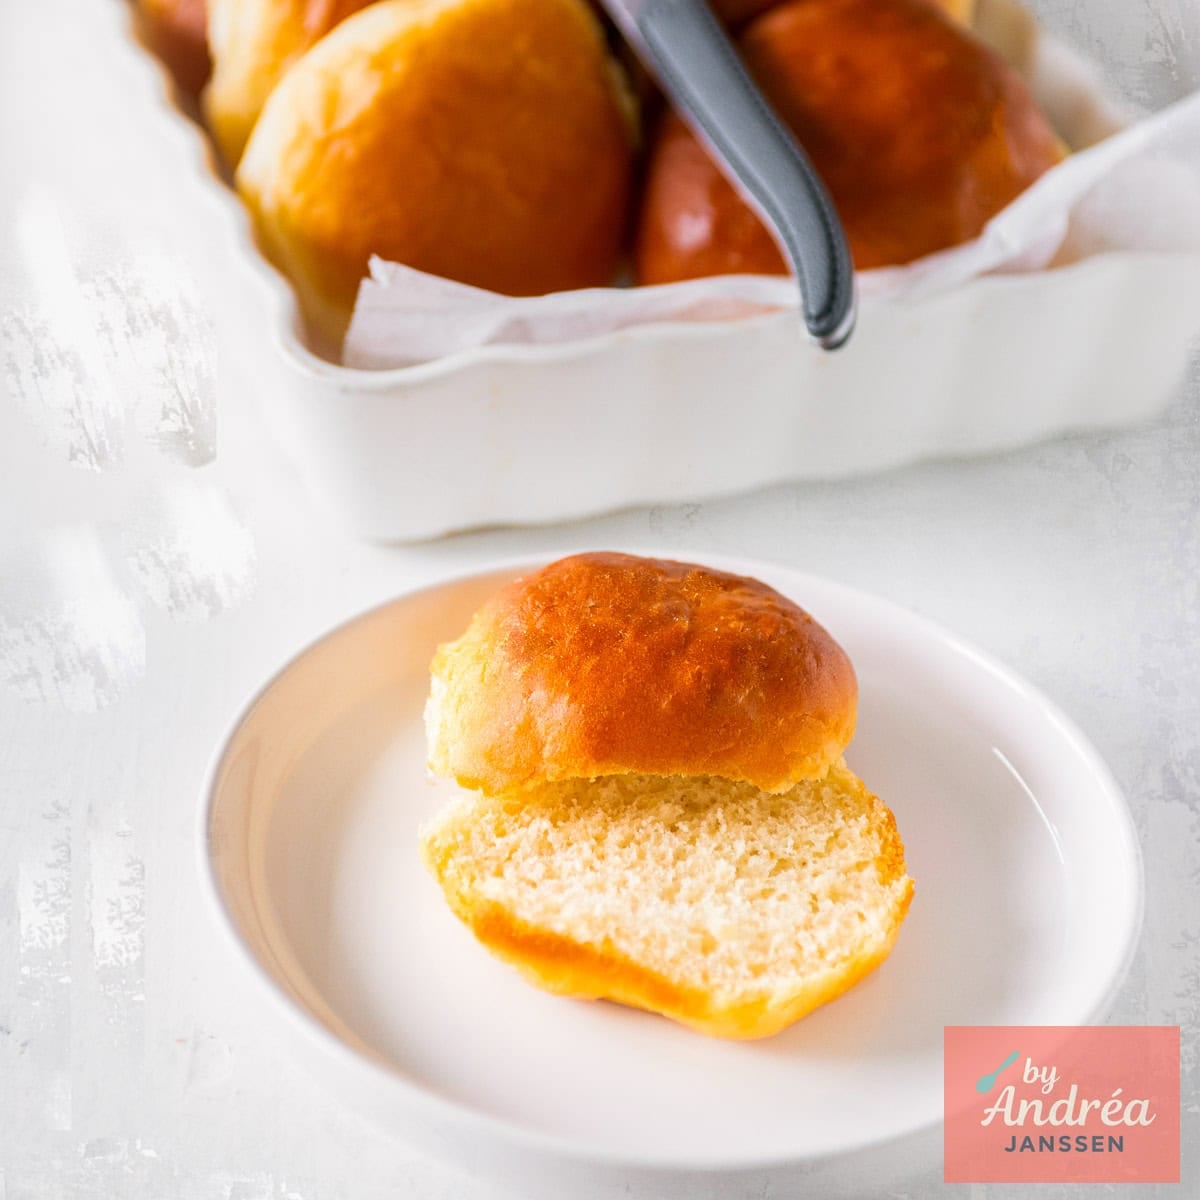
Soft white buns are the kind of bread that quietly takes over your day. You make them "for breakfast," then one disappears as a snack, another becomes lunch, and suddenly you're standing in the kitchen eating one plain like it's a totally normal life choice.
These are fluffy Dutch-style broodjes: light inside, tender crust, and extra soft on top thanks to one tiny move at the end (spoiler: butter, because butter always shows up when things get good).
Jump to:
Easy Soft White Buns You Can Bake at Home
Bakery buns are great… but they also require you to get dressed, find your keys, and interact with the outside world. This home version gives you the same soft, pillowy result, with a simple dough and clear steps.
No fancy shaping, no stress. Just a dough that rises twice, gets rolled into neat balls, and bakes up like little clouds.
These buns are mildly sweet, milky, and super soft. The inside is fluffy and pull-apart, and the top stays tender (not crusty) because you brush them with melted butter while they're still warm. That's the "bakery softness" trick.
This recipe was for the foodblogswap adjusted from the blog slowfoody (Dutch foodblog).
What You'll Need
Exact amounts are in the recipe card.
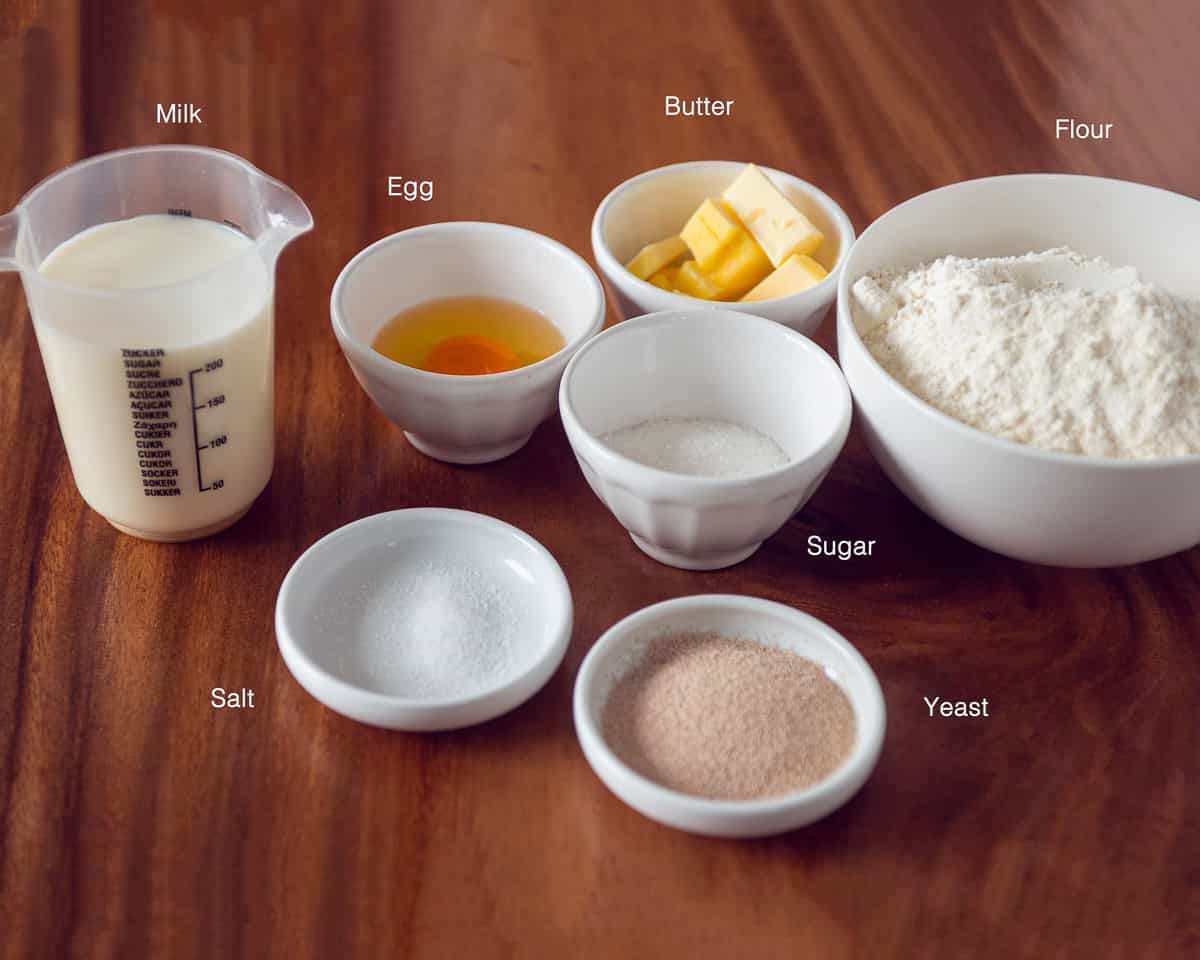
- Flour: The base of the dough. Start with this amount, then add a little extra only if the dough stays sticky after kneading.
- Sugar: Helps the yeast get going and gives the buns that subtle "soft roll" taste.
- Salt: Flavor, but it goes in after a short knead so it won't kill the yeast.
- Milk (lukewarm): Makes the buns softer and richer than water-based dough. Lukewarm helps the yeast wake up.
- Yeast, instant: The lift adds airiness. You dissolve it first so you know it's alive and ready to work.
- Butter (room temperature): Adds softness and that soft bite.
- Egg: Adds richness and helps the dough come together nicely.
- Vegetable oil: For greasing the bowl so the dough can rise without sticking.
- Melted butter (for brushing): The "soft top" secret. Brush right after baking.
- Extra flour (for dusting): For your work surface when shaping.
How to Prepare It
You'll find the full, step-by-step recipe card below.
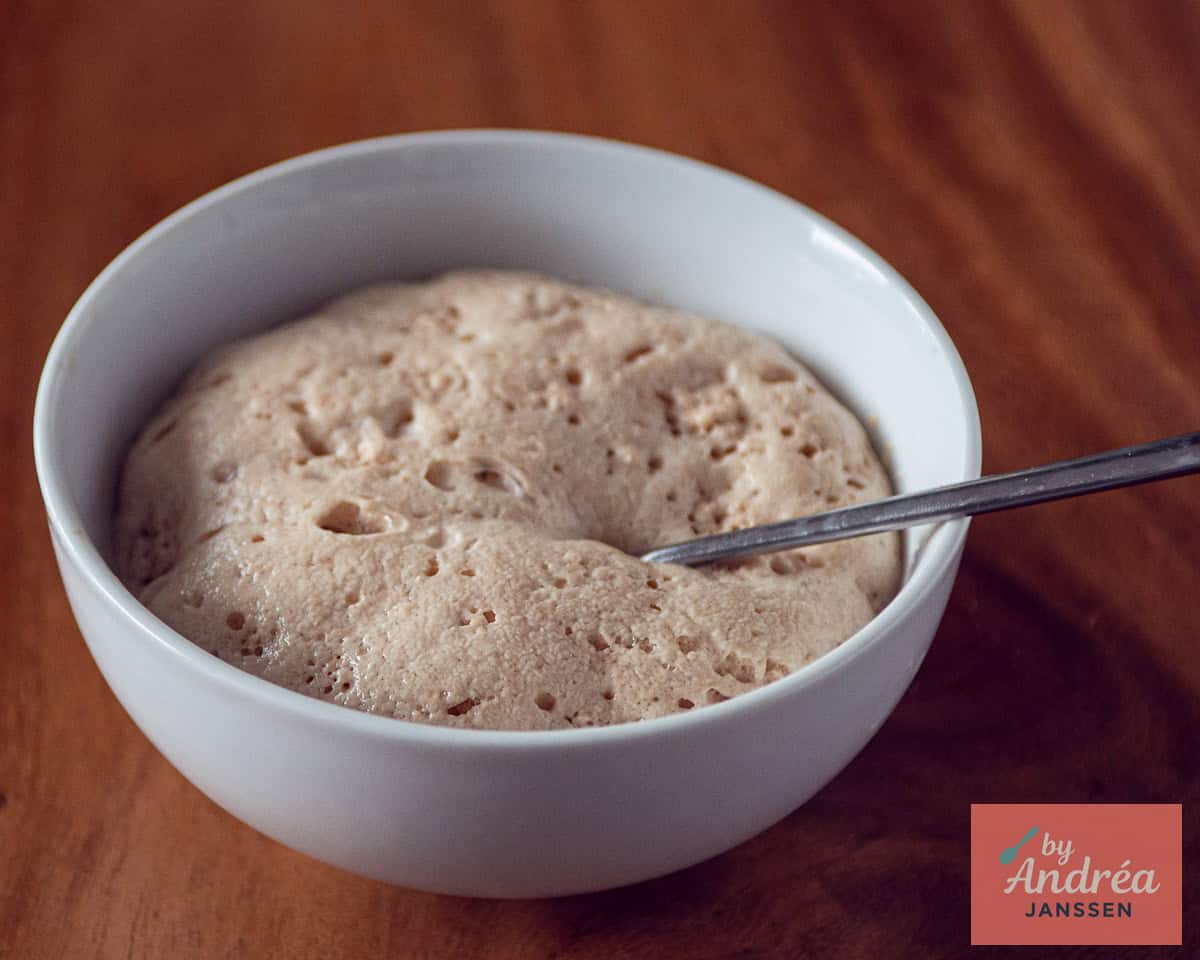
- Step 1: Warm the milk until it's lukewarm (not hot). Pour half of the milk into a small bowl, then add the yeast and sugar. Stir briefly and leave it for about 5 minutes, until the yeast dissolves and you see bubbles. That's your "yes, my yeast is alive" sign.
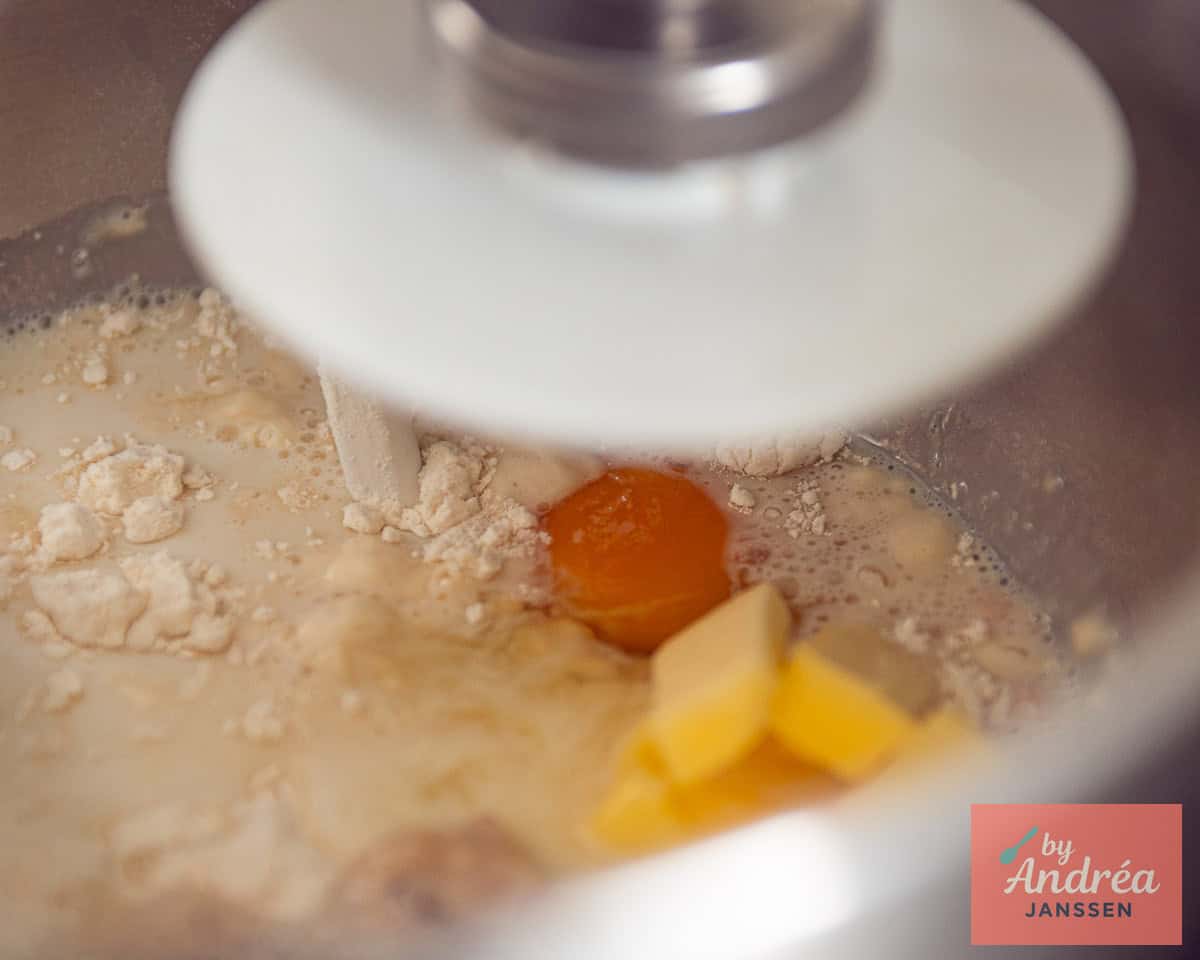
- Step 2: Put the flour in a large bowl. Add the remaining lukewarm milk, the yeast mixture, the beaten egg, and the room-temperature butter. Knead for about 5 minutes (mixer with dough hooks or by hand). Now add the salt and continue kneading. With a mixer, knead for about 10 more minutes; by hand, about 15 more minutes. You're aiming for dough that feels smooth and elastic. If it's still sticky after proper kneading, add a little flour-small amounts..
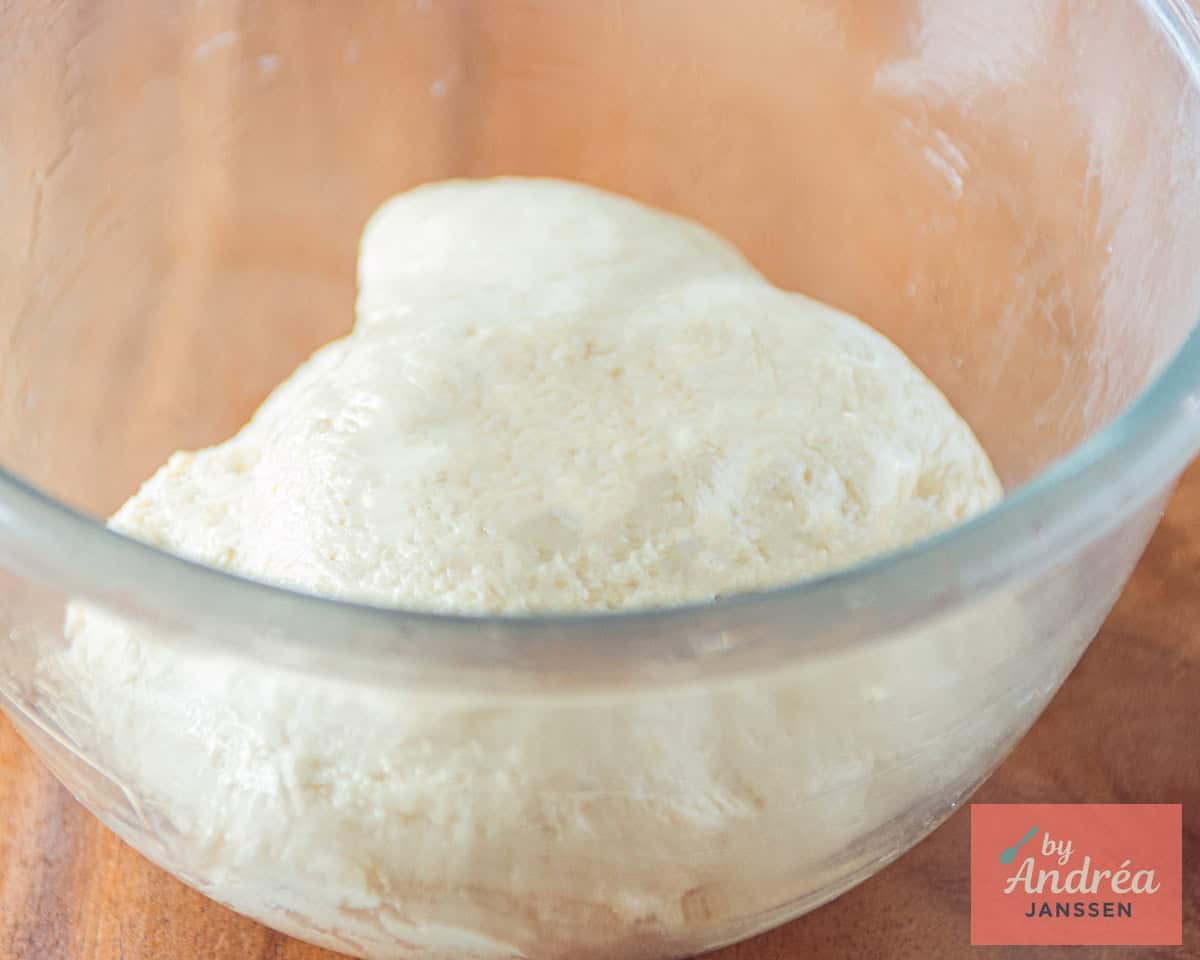
- Step 3: Grease a clean bowl with a little vegetable oil. Put the dough in, turn it once so it's lightly coated and then cover it with a slightly damp dishcloth and plastic foil. This keeps the dough from drying out during the rise. Let the dough rise in a warm place for about 90 minutes, until doubled in size.
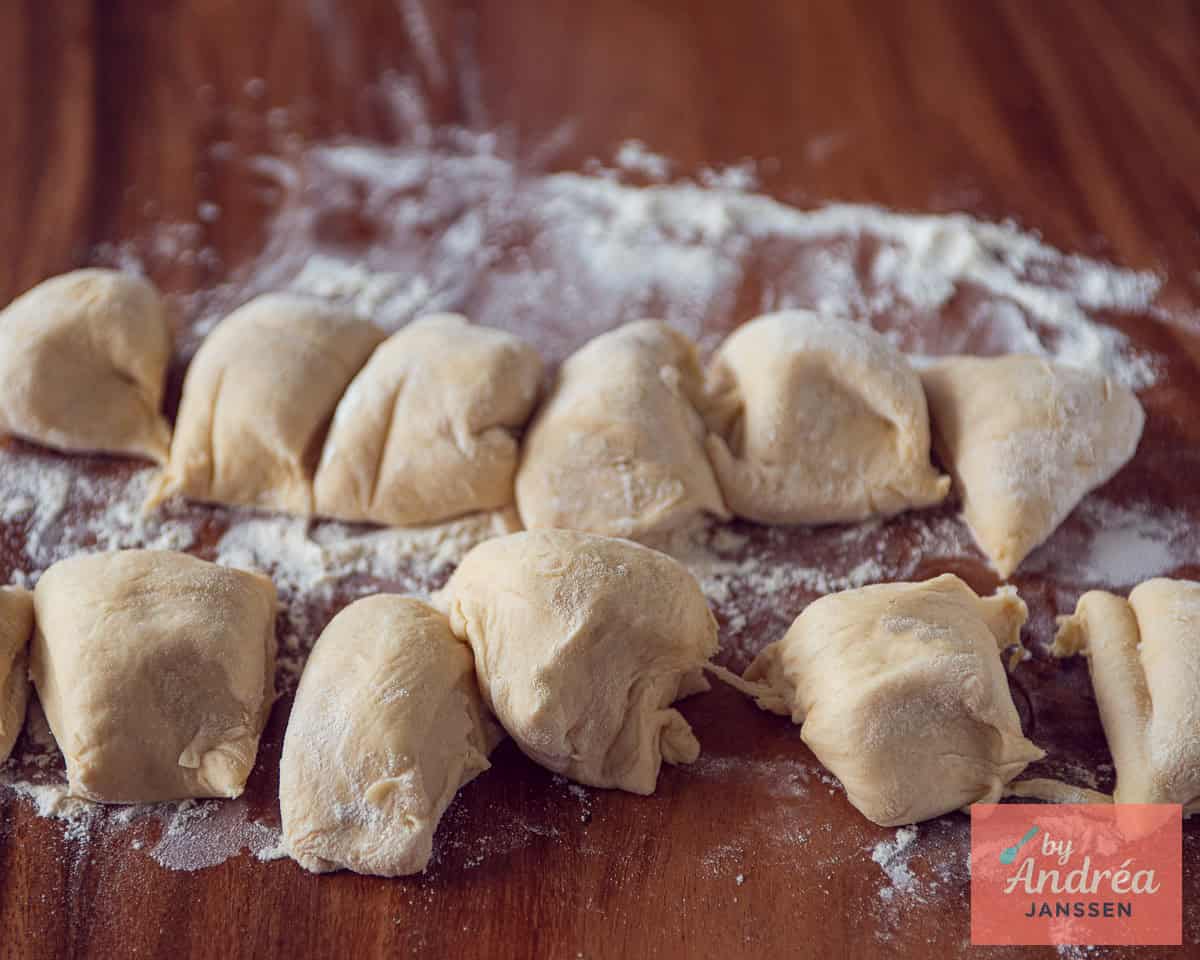
- Step 4: Dust your work surface with a bit of flour. Gently press the air out of the dough, then divide it into 12 equal pieces (weighing is the easiest way if you want buns that look like they belong together).
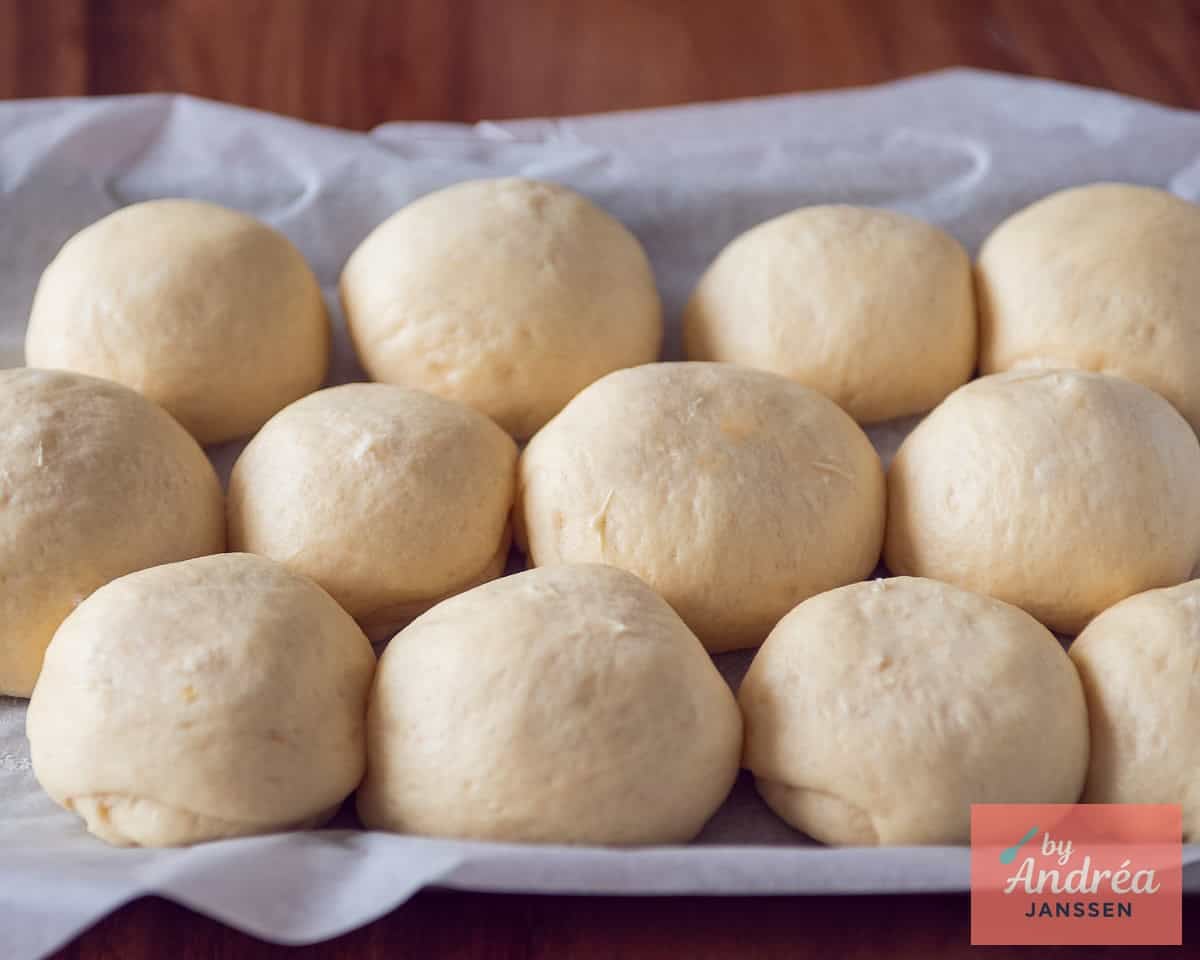
- Step 5: Shape each piece into a smooth ball: roll it lightly, then place your thumb underneath the ball, pull the dough down around your thumb, remove your thumb, and pinch the bottom closed. This makes the top smooth and tight, which helps the buns rise nicely. Place the dough balls on the lined baking tray with space between them. Cover again with the damp cloth and plastic foil. Let them rise until puffy and noticeably bigger (about 60 minutes is typical, depending on your room temperature).
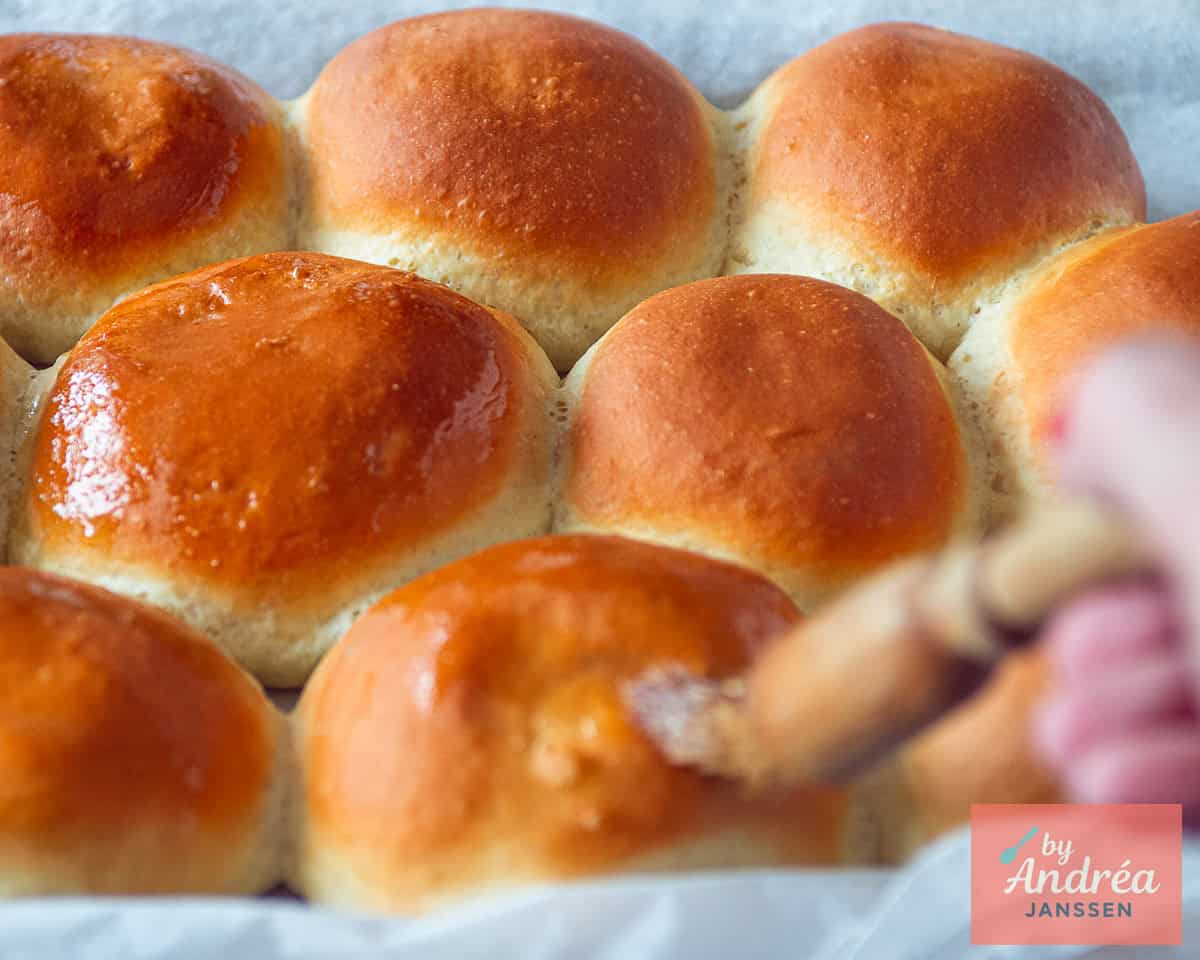
- Step 6: After the buns have been rising for 30 minutes, preheat the oven to 380 °F (190 °C). Bake for about 20 minutes, until lightly golden. The moment they come out of the oven, brush the tops with melted butter. This is what keeps the tops soft instead of turning into a crusty top.
Troubleshooting / Ideas
- If your dough feels sticky, knead longer first. Sticky dough often becomes smooth once the gluten develops. Only add extra flour if it's still sticky after proper kneading.
- If the dough doesn't rise, your yeast might be inactive or the milk was too hot. That's why the bubble check in the first step is so helpful.
- If the buns dry out during rising, they weren't covered well. Use a slightly damp towel plus plastic foil so the surface stays soft.
- If the tops turn hard, you likely skipped (or delayed) the butter brushing. Brush immediately after baking for that soft bakery finish.
How to serve them
- These buns are great with cheese, ham, jam or Dutch hagelslag (chocolate sprinkles)… honestly, most things taste better on a soft bun.
- They also make excellent lunch buns: slice, fill, and watch them disappear.

📖 Recipe
VIDEO

RECIPE CARD
Recipe Help
Two easy tools to make cooking even easier. Cooking mode keeps the screen on. The easy-step recipe displays the recipe step by step, including the ingredients needed. And you can adjust servings easily
Ingredients
- 1 tablespoon yeast, instant
- 2 tablespoons sugar
- 1 cup milk, lukewarm
- 3¼ cup all-purpose flour
- 3 tablespoons butter, room temperature
- 1 egg
- 1 teaspoon salt
- vegetable oil
- all-purpose flour, to sprinkle your work surface
- 1 tablespoon butter, melted, before covering
All my recipes are written both in Metric (gram / ml) and US Customary (cups / pounds). Here you can select which type of amount you would like to see.
Instructions
Preparation
- Line the baking tray with parchment paper.
Until the first rise
- Add yeast and sugar to ½ cup lukewarm milk. Stir and let stand 5 minutes until dissolved and bubbly.1 tablespoon yeast, instant, 2 tablespoons sugar, 1 cup milk
- Put flour in a large bowl.3¼ cup all-purpose flour
- Add remaining milk, yeast mixture, egg, and butter. Knead for 5 minutes.3 tablespoons butter, 1 egg
- Add salt and knead: mixer 10 more minutes / by hand 15 more minutes. Dough should be soft and elastic; add a little flour if still sticky.1 teaspoon salt
- Grease a bowl with oil. Add dough, turn once and cover with a damp cloth and plastic foil.vegetable oil
- Rise 90 minutes in a warm place until doubled in size.
Until the second rise
- Dust your work surface with flour.all-purpose flour
- Deflate the dough and divide it into 12 equal pieces.
- Roll each piece of dough into a ball. Then place your thumb at the bottom of the ball and pull the dough downwards. Shape into balls and close the bottom seam well.
- Place on tray with space between. Cover with a damp cloth and plastic foil. Let rise until puffy.
- Cover the balls with the slightly damp dish cloth and then with the plastic foil.
- Let the buns rise in a warm place.
Baking
- Preheat oven to
 380 °F after 30 minutes of rising time.
 - Bake for 20 minutes.
- Brush buns immediately with melted butter.1 tablespoon butter
Notes
- In a breadbox they'll stay fresh up to 3 days. Don't store bread in the fridge; the refrigeration changes the texture in a not-tasty way.
- Freezing works well for up to 2 weeks. Defrost about 3 hours ahead, or bake straight from frozen for about 3 minutes at 350 °F (180°C) to warm them up.
Nutrition


Natalie says
YUM! These buns look so soft and fluffy! Can't wait to try this recipe soon!
Andréa says
Hi Natalie, thank you, we loved the buns. Hopes yours turn out great too. Let me know I'm very curious!
Sula says
Fantastic - my mouth is watering!
Bhawana says
Buns definitely looking very tempting. outcome is just awesome
Jersey Girl Cooks says
Homemade buns are the best! So fresh.
Amy Chung says
OMG......they were amazing! My daughter smashed them!